Building and Booting Your Own Linux Kernel on Windows with WSL2 and QEMU
A step-by-step guide to downloading the source, compiling under WSL2, and running your custom kernel in a virtual environment without breaking your host system.

Introduction
The Linux kernel is the heart of millions of devices, from the phone in your pocket to the servers powering the web. For many developers and tech enthusiasts, the kernel feels like a “black box”, complex and untouchable.
But it’s just code. And you can compile it yourself.
Historically, learning to develop kernels required a second machine for testing because a single mistake could result in an unbootable system. Today, thanks to Windows Subsystem for Linux 2 (WSL2) and virtualization/emulation tools like QEMU, you can build and test custom kernels safely, quickly, and entirely within your Windows environment.
Whether you are aiming to become a kernel contributor, curious about how operating systems work, this guide will take you from zero to booting your own custom Linux kernel.
The Architecture of Our Laboratory
Before we start typing commands, let’s understand how our tools fit together:
Windows Host: Your main operating system.
WSL2 (Ubuntu): WSL2 actually runs a real Linux kernel inside a lightweight utility VM. We will use this as our Build Environment. We will download the tools and source code here because Linux code compiles best on Linux.
QEMU: A machine emulator. Instead of replacing the WSL2 kernel (which could break your WSL setup), we will use QEMU inside WSL2 to create a sandbox virtual machine. We will boot our newly compiled kernel inside this sandbox.
Phase 1: Prepping the Build Environment
I will assume you are using Ubuntu inside WSL2. If you haven’t enabled it yet, simply open PowerShell as Administrator, run wsl --install, and restart your machine.
1. Resource Allocation (Optional but Recommended)
Compiling a kernel is computationally heavy. By default, WSL2 might not use all your CPU cores or RAM. You can create a file named .wslconfig in your Windows user folder (e.g., C:\Users\YourName\.wslconfig) to give WSL2 more power:
[wsl2]
memory=8GB
processors=4
(Restart WSL via PowerShell with
wsl --shutdownfor this to take effect).
2. Create the Virtual Machine
wsl --install --name kernel-dev3. Installing Dependencies
Open your WSL2 terminal and update your package lists:
sudo apt update && sudo apt upgrade -yNext, install the required toolchain. This includes compilers (gcc, make), parsers (bison, flex), libraries for the configuration UI (libncurses-dev), and our emulator (qemu-system-x86):
sudo apt install -y build-essential libncurses-dev bison flex libssl-dev libelf-dev \
qemu-system-x86 qemu-utils fdisk busybox-static git wget cpio
Phase 2: Acquiring the Source Code
Kernel source code lives on kernel.org. You’ll see several branches:
Mainline: The bleeding edge. Where new features land first.
Stable: Latest stable version for general use.
Longterm: Maintained for years, highly stable.
We will use a git clone of the Stable tree. We use the --depth 1 flag to download only the very latest snapshot of the code, ignoring decades of git history. This saves gigabytes of space and network bandwidth.
# Move to your home directory
cd ~

# Create a workspace
mkdir kernel-dev
cd kernel-dev

# Clone the stable branch (this may take a few minutes)
# --depth 1: Creates a "shallow" clone (no history).
# --branch linux-rolling-stable: Targets the auto-updating stable release.
git clone --depth 1 --branch linux-rolling-stable https://git.kernel.org/pub/scm/linux/kernel/git/stable/linux.git

# Move into the source directory
cd linux
Phase 3: Configuration (menuconfig)
The Linux kernel is incredibly modular. It supports thousands of different hardware devices, file systems, and networking protocols. Before compiling, you have to tell the build system exactly what to include.
1. The Default Configuration
Since we are building a basic kernel to run in a QEMU virtual machine (which emulates standard x86_64 hardware), we can start with a default template.
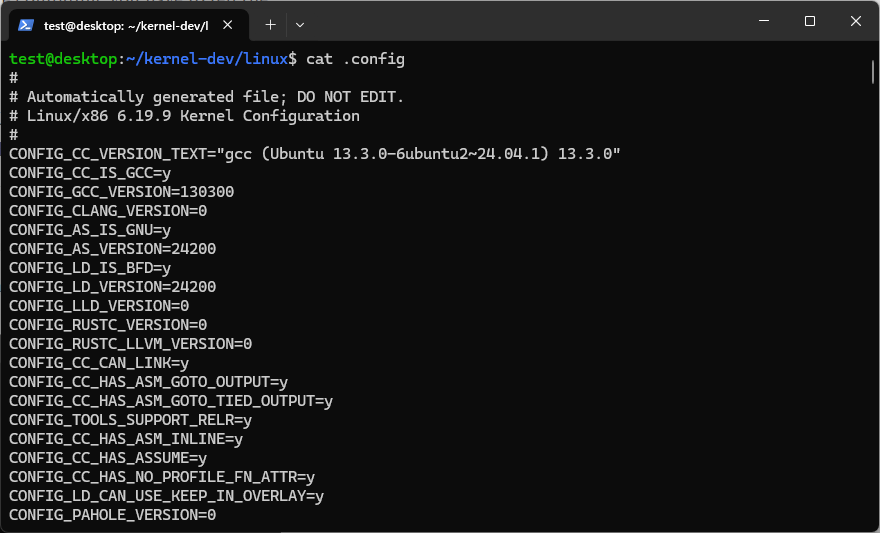
make x86_64_defconfigThis generates a hidden file called .config containing thousands of default settings.
2. Customizing the Kernel
Now, let’s customize it. Run:
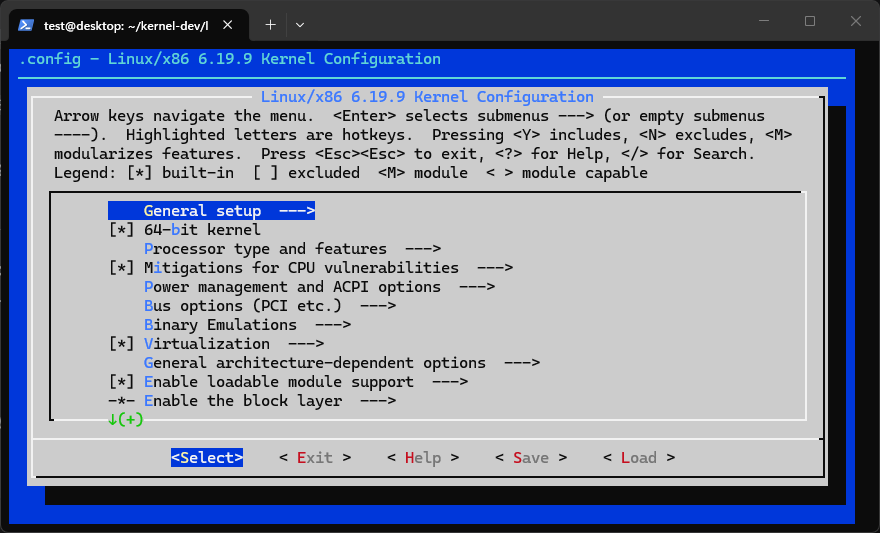
make menuconfigThis launches an older, terminal-based graphical interface. Use your arrow keys to navigate and the Enter key to select.
[*]vs[M]vs[ ]: As you browse, you’ll see these brackets.[*]means the feature is built directly into the core kernel image.[M]means it’s compiled as a separate “Module” that can be loaded later.[ ]means it is entirely excluded.
Let’s brand your kernel:
Navigate to General setup.
Go down to Local version - append to kernel release.
Press Enter and type a custom string, like
-custom-kernel.Press Enter to confirm, use the right arrow to select
<Save>, press Enter, then<Exit>until you are back in the terminal.
Phase 4: The Compilation
We are going to compile the bzImage (Big Zipped Image), which is the final, compressed kernel executable.
To speed up the compilation, use the -j flag followed by the number of CPU cores available to WSL. The nproc command detects this automatically.
make -j$(nproc) bzImageYour CPU usage will spike to 100%. Depending on your hardware, this will take anywhere from 2 to 20 minutes.
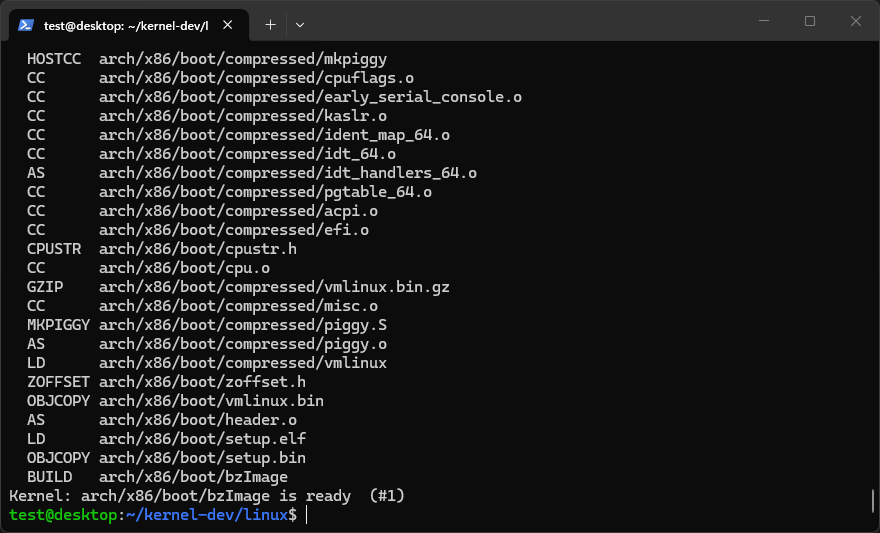
What is happening? The compiler is turning millions of lines of C code into raw binary instructions. If it finishes successfully, you will see a message at the bottom looking something like this:
Kernel: arch/x86/boot/bzImage is ready
Phase 5: Building an Initramfs (The Userspace)
A kernel alone cannot do much. Its job is to manage hardware and provide an environment for user programs to run. If a kernel finishes booting and finds no user programs to execute, it throws a “Kernel Panic” and halts.
If you want to see the exact line of code that kills the system when it can't find a program to run, look at init/main.c. After hardware initialization, the kernel reaches a final block of code where it desperately searches for a file named init or sh. If those if statements fail, it hits the panic() function.
if (!try_to_run_init_process("/sbin/init") ||
    !try_to_run_init_process("/etc/init") ||
    !try_to_run_init_process("/bin/init") ||
    !try_to_run_init_process("/bin/sh"))
    return 0;

panic("No working init found.  Try passing init= option to kernel. "
      "See Linux Documentation/admin-guide/init.rst for guidance.");
To prevent this, we need a Root File System (RootFS). For this tutorial, we will create an Initramfs (Initial RAM Filesystem). This is a tiny, temporary file system loaded into RAM that contains just enough tools to let us interact with the kernel.
We will populate it with BusyBox, often called the “Swiss Army Knife of Embedded Linux.” It bundles tiny versions of common tools (ls, echo, cat, sh) into a single executable.
1. Setup the Directory
cd ~/kernel-dev
mkdir initramfs
cd initramfs
mkdir -p bin dev proc sys
2. Add BusyBox and the Init Script
Copy the static BusyBox binary we installed earlier:
cp /bin/busybox bin/shNow, create a script named init. When the kernel finishes booting, it explicitly looks for a file named /init and runs it as Process ID 1.
nano initPaste the following:
#!/bin/sh
# 1. Mount essential virtual file systems
mount -t proc proc /proc
mount -t sysfs sysfs /sys

# 2. Redirect standard input/output to the serial console
exec 0</dev/console
exec 1>/dev/console
exec 2>/dev/console

# 3. Print a welcome message
echo "================================================="
echo " SUCCESS! Welcome to your custom Linux Kernel."
echo "================================================="

# 4. Launch a shell so we can type commands
/bin/sh
Save and exit. Make the script executable:
chmod +x init3. Package the Initramfs
We must package this folder into a cpio archive and compress it:
find . | cpio -o -H newc | gzip > ../initramfs.cpio.gzPhase 6: Booting in QEMU
We have our brain (the kernel) and our hands (the initramfs). Let’s put them in a virtual body.
Navigate back to the Linux source directory:
cd ~/kernel-dev/linuxRun QEMU with the following command:
qemu-system-x86_64 \
  -kernel arch/x86/boot/bzImage \
  -initrd ../initramfs.cpio.gz \
  -nographic \
  -append "console=ttyS0"
Breaking down the command:
-system-x86_64: Emulate a x86_64 PC.-kernel: Points to the custom kernel we just built.-initrd: Points to our custom RAM disk file system.-nographic: Disables the graphical window. We want output directly in our WSL terminal.-append "console=ttyS0": Passes a boot argument to the kernel, telling it to send all text output to the serial port (which QEMU maps to our terminal).
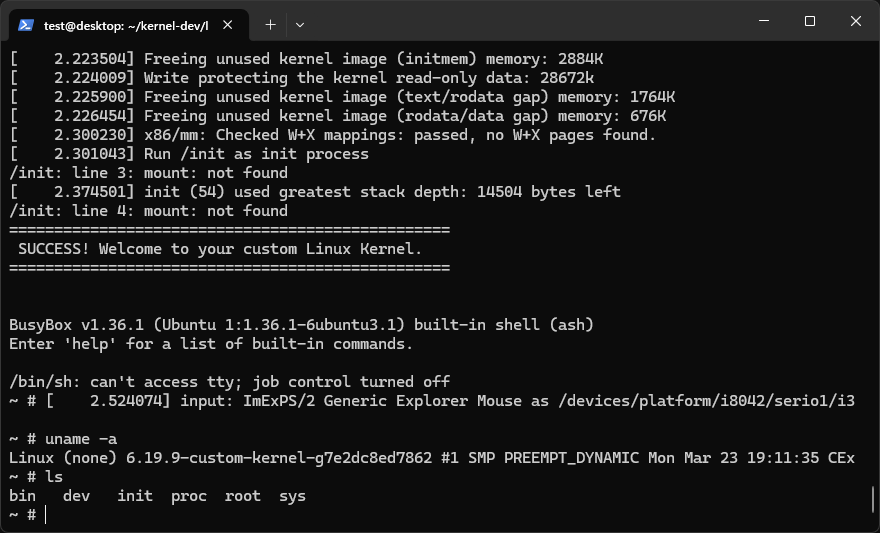
If successful, you will see a rapid stream of kernel boot logs. Finally, it will print your welcome message and drop you into a # prompt.
You are now inside your custom operating system.
Try proving it’s yours. Type:
uname -aYou should see your -custom-kernel tag in the output. Try exploring the filesystem with cd and ls.
Exiting the emulation
Because we are in a headless serial console, Ctrl+C won’t exit the emulator. To kill QEMU, use its escape sequence: Press Ctrl+A, and then press X.
Conclusion and Next Steps
Congratulations! By using WSL2 for compilation and QEMU for emulation, you’ve created an environment for OS development.
Where do you go from here?
Modify Source Code: Open
init/main.cin the Linux source, find thestart_kernel()function, and addpr_info("Hello from Substack!\n");. Recompile and watch your message appear in the boot logs.Write a Kernel Module: Learn how to write a simple “Hello World” driver, compile it as a
.kofile, and load it into your running QEMU system usinginsmod.Optimize: Rerun
make menuconfigand turn off network drivers, sound drivers, and file systems you don’t need. See how small you can make thebzImagefile!
Have you ever compiled a kernel before, or did you run into any weird errors following this guide? Drop your experiences in the comments below!